This is continuation of Part 1. Please continue with part two
Creating and configuring ADMTAdmin Service account
Now we need to create and configure ADMT service account to make sure ADMT service account (admtadmin) account has appropriate rights to perform the migration tasks
1. Create a Server account admtadmin in green.com and add the green\admtadmin to the local domain admin group of green.com
2. Connect Red.com active directory users and computers and add green\admtadmin as member of built in Administrators group
Figure 17. Adding “green\admtadmin’ as the member of built-in administrators group in red.com
Preparing and configuration PES (Password Export Server)
1. Login to the domain member server in green.com where the ADMT tool is installed and run the below command. This is to generate the encryption key for importing in to import it the source domain controller. This command will generate the encryption key file at C:\Pes.pes and it will prompt for the password and confirm password.
admt key /option:create /sourcedomain:red /keyfile:”c:\PES.pes” /keypassword:*
Figure 18. Exporting Encryption key from ADMT server
2. Copy the file C:\pes.pes to the root Directory (c:\) source(red.com) domain controller
3. login to source domain controller (red.com) and install the PES tool.
4. During the installation it will prompt for the location of the encryption key. Click on browse and point to the encryption file which was copied recently (C:\pes.pes) and click on Next
Figure 19. Importing Encryption key file into the Password export server
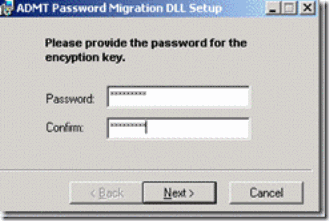
5. Enter and confirm with the same password with used to which exporting the encryption key at point 1 above and click on next
Figure 20. Confirming with password for importing encryption key
6. It will prompt to PES Service account. Specify the account green\admtadmin account with the password and click on ok to continue. Once configuration is completed, server will prompt for the reboot and confirm to reboot the server.
Figure 21. providing green\admtadmin service account to run the PES serve service
7. Password Export server will not start automatically. It has to be start manually. Only start when ever required or when ever migration is performed.
Figure 22. Password Export server service is disabled by default
8. Right click on the service and select start. you should be able to see the started status on the services console
Figure 23. Password export server service status after manually starting the service
configuring source domain controller(red.com)
Once PES service is configured then we have to configure registry to allow password export. Below is the steps to perform the same.
1. Login to the domain controller and start registry editor (regedit)
2. Navigate to HKEY_LOCAL_MACHINE\SYSTEM\CurrentControlSet\Control\Lsa
3. Access Allowpasswordexport and change the value form 0 to 1
Figure 24. Enabling password export settings from the registry
Disable SID Filtering
if we need SID history on the target domain, then we have to disable SID filtering. Run the below command on the target domain to disable SID filtering
netdom trust source.com /domain:target /quarantine:No /usero: source_admin_act /passwordo: source_administrator_pwd
Figure 25. Disabling SID filtering
Migrating User from red.com and green.com
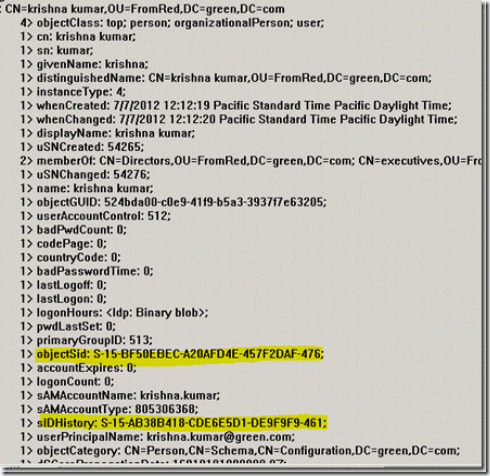
1. We will be migration user krishna.kumar from red.com to green.com. We can verify and make a note of user objectsid from the source domain with the help ldp tool or simple ldap query.
Figure 26. ObjectSid details of user krishna.kumar
2. login to the target domain member server with the green\admtadmin where ADMT tool is installed
3. Start Active directory migration tool from administrative tools
4. right click on the Active Directory Migration tool and select User Account migration wizard and click on Next
Figure 27. Starting the User Account Migration Wizard
5. Select source domain,source domain controller and Target domain and target domain controller and click on next
Figure 28. Source and Target domain details for migration
6. Select users from the domain under User Selection option and click on next
Figure 29. Manual user selection
7. Add the user krisha.kumar and click on next
Figure 30. Adding krishna.kumar for user migration
8. Create a Target OU in Target domain and point to the same to create the migrated user account
Figure 31. Select the target OU where the migrated used should be created
9. Select the option Migrate passwords
Figure 32. Selection migrate Password option and select the source domain controller
10. Select the option Target same as source and also enable to the option Migrate user SIDs to target domain and click on Next
Figure 33. option to selected on how to handle migrating accounts
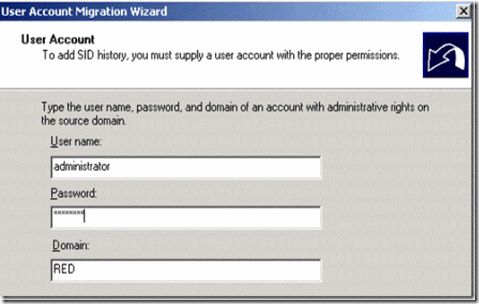
11. Type account from the source domain which has administrative rights and click on next
Figure 34. Admin account for adding SID History on migrated account
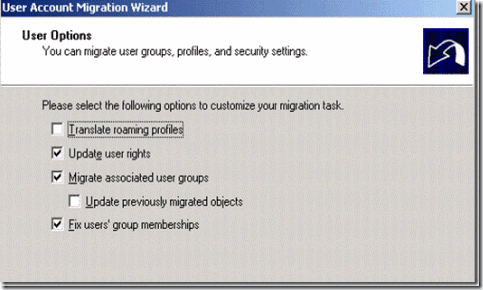
12. Select some of the import option likes update user rights, Migrate associated user group, fix users group membership and click on next
Figure 35. Option to migrate associated user groups, profiles and settings
13. Entire AD properties will be migrated to the target account. Just in case if you need any kind of properties execution then figure 36 shows the option to exclude the same.
Figure 36. Option to execute ad properties on the migrating objects.
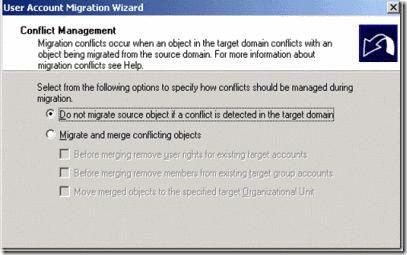
14. keep the default option do not migrate source object if the conflict is detected it the target domain and click on Next
Figure 37. Conflict management option
15. Click on Finish to kick start the user migration
Figure 38. Finishing the user migration
16. Once the migration is completed, you should be able to see the details on the screen. To get some advance or log detail, click on view log
Figure 39. Migration progress status
17. log file has some very good amount of information on what exactly happened during the migration. Details like Account been replicated, created, SID history added, password copied and other group membership details etc.
Figure 40. Migration log details
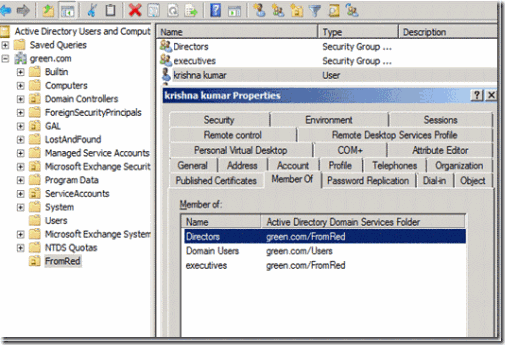
18. On the target domain we can see the Krishna.Kumar is create with all the group membership and also see that associated groups is also been migrated to the destination. You can also verify the entire user properties.
Figure 41. krishna.kumar user property after migration with group membership details
19. We can also verify the object Sid and Sid history been crated on the new object in the target domain. Sid history is the same source objectsid.
Figure 42. Objectsid and SidHistory details of krishna.kumar after migration
20. To check if the password is been copied, login to one of the client computer with the same password as the source domain. Below figure 43. shows the details of the login account with the domain name.
Figure 43. login details on krishna.kumar on the green.com workstation




![clip_image002[5] clip_image002[5]](https://smtpport25.files.wordpress.com/2012/07/clip_image0025_thumb.gif?w=589&h=172)
![clip_image002[7] clip_image002[7]](https://smtpport25.files.wordpress.com/2012/07/clip_image0027_thumb.gif?w=417&h=438)
![clip_image004[5] clip_image004[5]](https://smtpport25.files.wordpress.com/2012/07/clip_image0045_thumb.gif?w=557&h=222)
![clip_image006[6] clip_image006[6]](https://smtpport25.files.wordpress.com/2012/07/clip_image0066_thumb.gif?w=578&h=382)
![clip_image008[5] clip_image008[5]](https://smtpport25.files.wordpress.com/2012/07/clip_image0085_thumb.gif?w=493&h=225)
![clip_image010[5] clip_image010[5]](https://smtpport25.files.wordpress.com/2012/07/clip_image0105_thumb.gif?w=471&h=324)
![clip_image012[5] clip_image012[5]](https://smtpport25.files.wordpress.com/2012/07/clip_image0125_thumb.gif?w=457&h=366)
![clip_image014[5] clip_image014[5]](https://smtpport25.files.wordpress.com/2012/07/clip_image0145_thumb.gif?w=467&h=294)
![clip_image016[5] clip_image016[5]](https://smtpport25.files.wordpress.com/2012/07/clip_image0165_thumb.gif?w=479&h=354)
