Shoviv Exchange Server Suite

Shoviv Exchange Server Suite

Shoviv Exchange Server Suite is a bunch of key tools which Exchange server /Helpdesk admin must have handy.  This suite can rescue Admins from critical issues which they can encounter as part of the day-to-day operations. Below are some of the high-level functions of the Shoviv Exchange Server Suite.

It offers some great features like

Recovers corrupted EDB, OST, and PST Files

Corruption of EDB is not very common but if it happens then you are in deep trouble. It takes ages to repair an EDB file. Quick recovery would be to create a dial tone mailbox so users can access send/receive new emails then use Shoviv Exchange Server Suite to restore the EDB contents to the user’s PST. You could also use it to recover the corrupted PST/OST content to the new one.

Exports OST file content to Outlook PST, Exchange Server, or even Office 365 mailbox(es)

Outlook Data file OST is to use the store to the offline synchronized copy of your mailbox information on your local computer. This allows users to continue to access email when they are not connected to the network and it also reduces the load on the exchange/network by making connect to Exchange one regular internal and not connected all the times. These features allow users to export the content of the OST file to PST or event directly to the Exchange /office 365 mailbox(es).

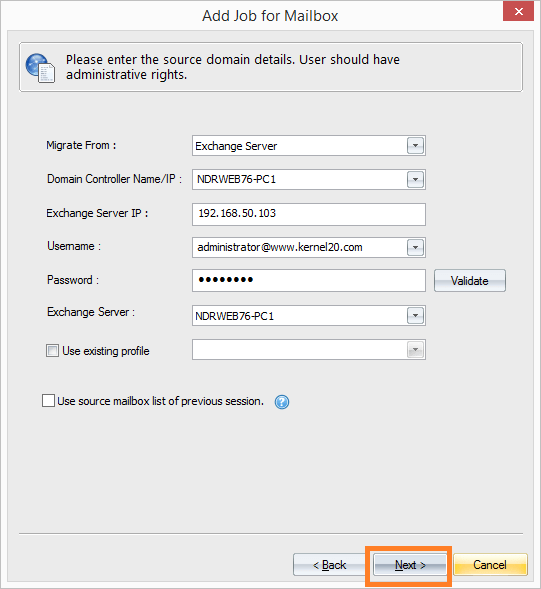
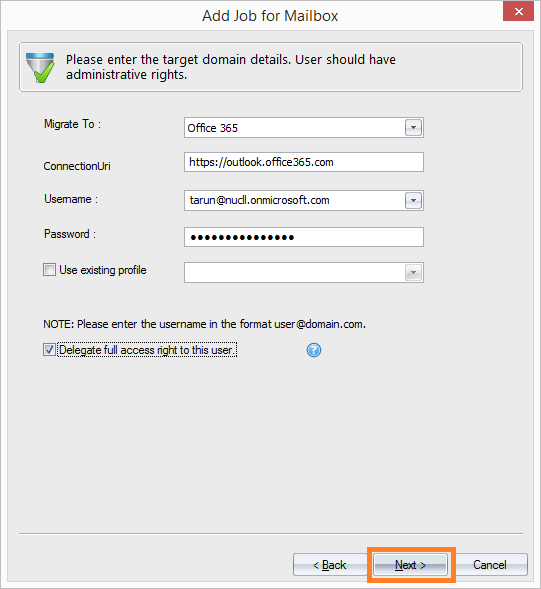
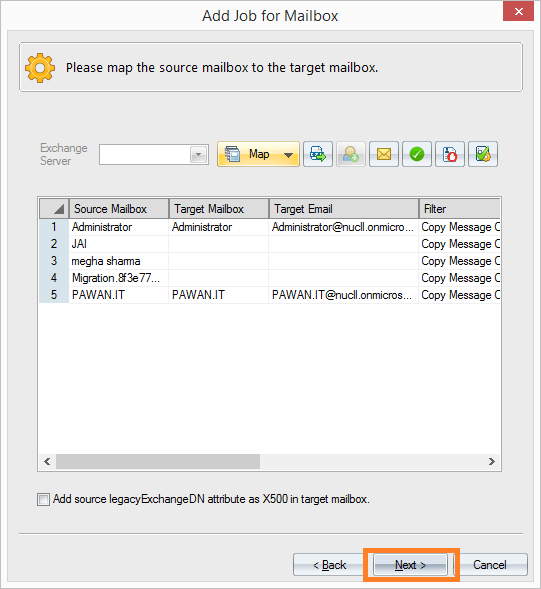
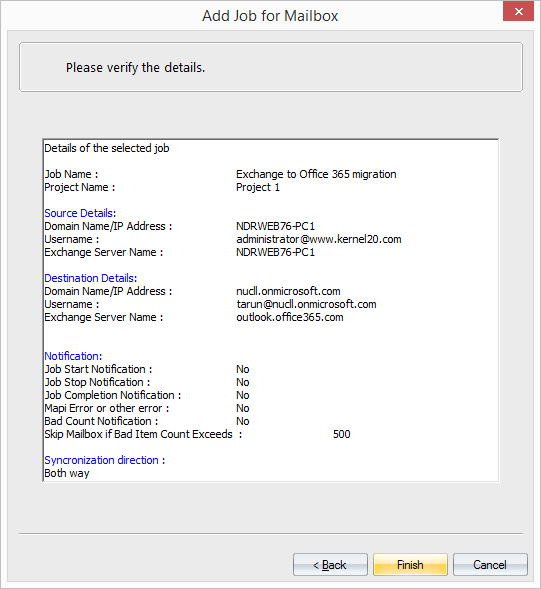
Migrate the content of Exchange mailbox to Office 365 mailbox and vice-versa

While migrating  the mailboxes from one version of Exchange to another E.g. You cannot upgrade to Exchange 2019 directly from Exchange 2010 and need to follow two-step approaches. First, migrate from Exchange 2010 to Exchange 2013/2016. Then Migrate to Exchange 2019 from Exchange 2013/2016.  To avoid these two steps approach it needs to spin out a new Exchange organization with Exchange 2019 and use Shoviv Exchange Server Suite to export all the content from  exchange 2010 to Exchange 2019 mailbox directly.

Export the contents of Mailboxes from EDB to Outlook PST /Exchange / Office 365 mailbox(es) directly.

This feature allows admins to Export the content of the EDB to users’ PST files or connects to another exchange server/office 365. Eg. There are scenarios where a company gets acquired / merges. This can happen so quickly and the admin may not have time to merge the Exchange Org and do the co-existence to perform graceful migration.  The simplest and quick solution is to provision a new mailbox for all the users in the parent exchange organization then copy the EDB files to the parent Exchange org and then export the content directly to the target mailbox.

Import PST Files into Live Exchange and Office 365 Mailboxes.

Many organizations have a PST culture and allow users to create the PST on their workstations and some organizations don’t allow PST at all.  If you have the requirement to import Mulitple PST to mailboxes then you will have a challenge. You need Exchange and PowerShell skills to automate this process.  This change can be easily addressed using the  Shoviv Exchange Server Suite

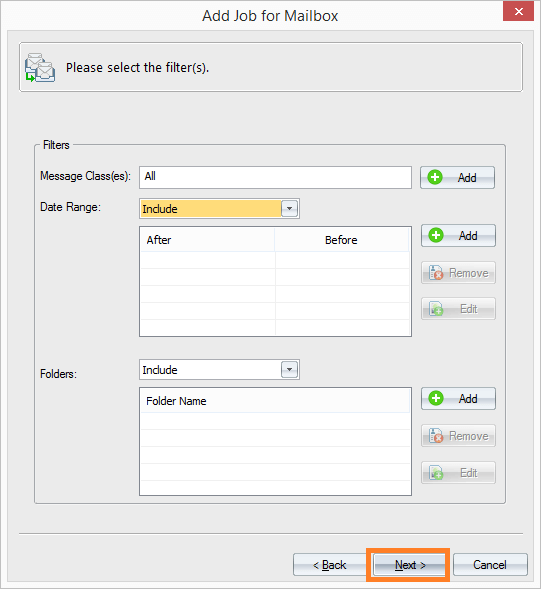
Advances search and filter to find the required message and export the contents

This is can be a great tool for the Legal / Compliance /Cyber depart of the organizations. Native out-of-box Exchange mailbox export offers limited functionality and but this tool can be used to search and export the specific mail items only with the specific message class, item dates, etc.

Incremental Export/Backup in PST files/Live Exchange/Office 365 Mailbox(es)

The incremental backup/export is a great time saver and deduplication option. Eg. users can have a situation where they need to backup/export the mailbox content in multiple date intervals. Here the incremental backup/export option allows the software to skips already exported items and prevents duplicity while processing again. Besides this, the Export and backup process depends on the internet connection, and if a sudden network issue occurs, then the migration process gets stuck. In this scenario, the incremental option comes in handy to resume the migration process.I would recommend this tool for any organization. It offers great features to address many day-to-day operations and critical scenarios. I have seen many bad days with Exchange and when it hits it can be a disaster.  Shoviv Exchange Server Suite will change the way you handle many scenarios. It reduces tons of effort and time to allow you to focus on the thing that matters.

Kernel Migrator for Exchange

Migration of Exchange can be a complex, challenging and stressful task. It needs in-depth knowledge on Exchange and all the system connected to Exchange. Also, need to make sure the users are not affected during the migration with no data loss.

Kernel Migration helps to migrate Exchange mailboxes from one version of Exchange to another. Weather it can be a cross forest migration or migration from on premises to a hosted solution or even to your tenant in office 365. This tool supports all version of Exchange starting from Exchange Server 2000 to Exchange Server 2016, and hopefully, it support Exchange server 2019 migration soon as well. Kernel Migrator for Exchange is a clean and comfortable to use interface to make complete process more comfortable and have a controller over it.

In addition to mailbox migration Kernel Migration tool helps to perform the below:

· Pre-Migration Analysis.

· Public folder migration

· Global Address Book (GAL) Sync.

· Migrate outlook Rules

· Update outlook profile when mailbox is migrated.

· Reporting

· Migration cleanup

· Rollback Mailbox migration

· Rollback public folder migration

· Rollback GAL sync

Pre-Migration Analysis

Pre-Migration Analysis is to estimate the time it takes for migration. It helps to plan the migration and allow no or limited imaged to the end users. It allows to estimate the both the time for mailbox and the public folder data.

Public folder migration

Public folder migration can be tricky and complicated. Native scripts officering from Microsoft is manual and complex. This tool helps to migration the public folder data migration and also easily migration the public folder permission.

Global Address Book (GAL) Sync

GAL Sync is used when Exchange Cross forest migration performed. It helps to sync all the mail accounts from the source forest to the target Exchange forest as mail contacts. This tool can be used for GAL Sync as well to sync the email objects from both the forest as mail contacts. This helps to see the users from other forest users in their local address book. It also offers excellent control on the objects it can sync and exclude.

Migrate outlook Rules

Local Outlook Rules can also be uses to migrate from the source to the Target outlook. This option helps to have no or minimum action from the users end when the mailbox migrated.

Rollback

Rollback option is a great benefit which we can make use when we need it. Migration can many times leads to a rollback due to various reason. We should always be in a position to rollback to a state which was before. Kernel migrator for Exchange offers to rollback mailbox migration, public folder migration and also GAL sync objects.

Let’s see how simple is to migration mailbox from on-prem to office 365 using Kernel Migrator for Exchange.

1. Install the Kernel migration on the source forest Exchange server

2. Start the Kernel migration for Exchange -> click on Add project -> provide a Project Name.

1

3. Click on Add Job for Mailbox -> select the Project then provide the appropriate name and click Next

2

4. Select Migrate from Exchange Server then provide the Domain controller and other necessary details followed by the administrator account having full mailbox permission for each source mailboxes and click NEXT

5. In the next page slect the mailboxes which you wanted to migrate. You can drill down the OU where you have the users, or you can select the users which needs to migrate. We can also import CSV file with the list of mailbox to migrate.

6. In the next page, select migrate to Office 365 then provide the office 365 admin account credentials and click Next

7. This page is add any exception to migration content. By default, full mailbox is migrate. Select Next to continue with the next page.

8. Now select the corresponding source and target mailbox, so that content migrated to the correct target mailbox and click Next

9. Specify the Bad item limit which it can ignore before the migration fails then specify the how the mailbox content to synced between source and target mailboxes. Then click Next to continue

10. Provide the email address of the engineer who need to get the migration status update notification and click Next to continue

11. Select the time when the mailbox sync to happen. To avoid any mailbox sync in the working hours and also to save the network bandwidth.

12. Scheulde the sync when you wanted to start and also allows option to configure who should get detailed migration report. Click Next to create the migration Job.

13. The final configuration page provides detailed summary of all the configuration selected and allow us to validate. Based on the selection name, Kernel Migrator performs the migration.

Conclusion:

Kernel Migration for Exchange is clean and easy to use tool. It reduces the efforts and time for the Exchange administrator with minimum impact to the end users. It also provides detailed report to the administrator and other necessary alerts when any issues occur. It allows administrator to have great control over the migration which native migration tool does not offer. Certainly, would recommend this tool for the user’s migration from onprem to office 365.

Stellar Exchange Toolkit – One Stop Solution

Stellar Exchange Tool Kit is the one stop solution for most of the Exchange on-premises and Office 365 needs. You may have any version of on-premises Exchange; it may be legacy Exchange Server 2003 / 2007 / 2010 / 2013 or even the latest Exchange Server 2016. There are various tools available in the market to do all the stuff which Stellar Exchange Toolkit offers but there is no other tool which has all the features of Stellar Exchange toolkit. Stellar Exchange Tool Kit is the suite of many great features and does it with accuracy and preciseness

· Stellar Phoenix Mailbox Exchange Recovery

· Stellar Mailbox Extractor for Exchange Server

· Stellar OST to PST Converter

· Stellar Mailbox Extractor for Exchange Backup

· Stellar Phoenix Password Recovery for MS Exchange

image

Figure: Stellar Exchange Toolkit

Let’s talk about each of the features it offers in details.

Stellar Phoenix Mailbox Exchange Recovery

Microsoft Exchange Database uses Extensible Storage Engine (ESE) for the database architecture. Exchange database contains different mailboxes like users, shared, room, etc. Each mailbox has various items types like messages, attachments, calendar, notes, contacts, tasks and is hierarchically stored in the different folders. There are many reasons to for the mailbox database corruption; it could be because of hardware or logical corruption. These corruptions are irreversible.

Stellar Phoenix Mailbox Exchange Recovery feature is to recover the corrupted Exchange database (EDB) file and export the data in the usable format. Exchange database correction rarely occurs and but when it occurs, then we are in deep trouble. Organizations offer large mailboxes for the users, and details size growth is enormous. Recovering the large database using the native Exchange ESEUTIL /P command takes forever. If ESEUTL /P sometimes may not fix the issue and end up to start over from the beginning. Phoenix Mailbox Exchange Recovery helps to overcome all the Hazel of running ESEUTIL repair and all the wait time. It can connect to the database, fixes the Database corruption and then export the mailboxes content to the target mailbox. Alternatively, we can even export the mailboxes content to PST, MSG and EML files.

Steps to Recovery Exchange Mailbox Database

1. Start Stellar Phoenix Mailbox Exchange Recovery

2. Connect to the offline EDB file using Select EDB option or use Find EDB to find the EDB file on the local machine

image

3. It has two scan options Quick Scan and Extensive Scan. A quick scan can fix most corruption, but extensive can give better results.

image

4. Once it repairs the EDB file, it lists all the mailboxes available in the EDB database file.

image

5. We can select the individual mailbox and export the content in the required format list PST. MSG, EML formats. It can even export the connect to the user’s Exchange mailbox or office 365 mailboxes.

image

6. We can also export the individual mailbox item or even the contents of the mailbox folder to the required format.

image

Stellar Mailbox Extractor for Exchange Server

Microsoft Exchange Database uses Extensible Storage Engine (ESE) for the database architecture. Exchange database contains different mailboxes like users, shared, room. Each of the mailboxes has various items types like messages, attachments, calendar, notes, contacts, tasks and is hierarchically stored in the different folders. These items can get corrupted for various reason, and natively there are limited options to fix it. Many exchange administrators move the mailbox from database to another database. During the mailbox move, it copies the items which are not corrupted and leaving the corrupted items. However, this solution does not fix the corrupted messages and get it in the readable format.

Stellar Mailbox Extractor for Exchange Server feature can connect to the online or offline Exchange database and select the required mailbox and export to PST. It also allows preview each of the items in the mailbox and export one or more articles in the required format like HTML, RTF, PDF and others supported formats.

Stellar OST to PST Converter

Stellar OST to PST Converter is to convert OST files to your local machines to the PST file format, and it can split the PST into multiple management PST files. It can even export the email content to the Exchange Server mailbox or even to office 365 mailboxes.

This feature comes in handy when you have the corruption in a mailbox or database or even the loss of Exchange server itself. OST to PST help you to overcome the situation, and it scan the OST file on the local user’s machine and can restore the content to the PST. Outlook 2007 and above supports Unicode version PST, and they can be as bigger as 50 GB and more. OST to PST Converter can also export the content to Exchange mailbox or Office 365 mailbox. It also allows to saves the individual or email box content in different format like MSG, EML, HTML, RTF, and PDF

Stellar Mailbox Extractor for Exchange Backup 8.0

Stellar Mailbox Extractor for Exchange Backup is to features to restore the mailboxes or mailbox contents from Exchange Backup. Exchange Backups are a necessary component of Exchange infrastructure. Most of the Organizations do a backup on daily basis, and there are often requirements to restore the content from backups. Many a times Mailbox content restore a full-time activity, and it involves a lot of efforts and time using native Exchange.

Stellar Mailbox Extractor for Exchange Backup can connect to the Exchange Backup files and quickly scan through the content and lists all the mailboxes available in the backup files for restore. The administrator can select the one or more user mailbox and save the content to PST. It also allows the administrator to save mailboxes or individual email content to file formats like MSG, EML, HTML, RTF, PDF, and even to office 365. This software also helps to repairs Windows NT Backup file and Symantec VERITAS Backup Exec file with BKF formats.

Stellar Phoenix Password Recovery for MS Exchange

Stellar Phoenix Password Recovery for MS Exchange is not an Exchange component, but it is for Microsoft Windows Server. It helps to break the windows server local administrator password. There are many situations where we need to log in as a local administrator, but administrator does not have the local password. It supports Microsoft Windows 2000 Server, 2003 Server, 2008 Server and 2012

Stellar Phoenix Password Recovery for MS Exchange required to download Boot image ISO from the website and burn it to a CD. Make necessary changes in the BIOS to boot from the CD and boot the server using it. Finally, use ResetPassword.exe to restart the password of the administrator and reboot the machine.

Conclusion:

To perform some of the operations on the Exchange online mailbox database, we need to have the necessary permission to connect, and preferably we need full mailbox access. I think Stellar Exchange Toolkit is a great tool and necessary required for Exchange Server Administrators. I can honestly say I loved this product. This application not only worth its cost but also have amazing features such as user-friendly interface, scanning speed, flexible recovery & export option & live preview option. I would definitely give a 5/5 rating where the software met and exceed my expectations.

You can download the copy of the software from the below link:

https://www.stellarinfo.com/email-tools/exchange-toolkit.php

Managing Accessibility of OST files through Cloud-based Platforms

Implementing Cloud-based Platform Migration

Cloud-based migration is a next generation migration option that readily reduces the chances of corruption and makes accessibility of files quite easy. As far as OST files are concerned, they are also preferred to be migrated in the same platform without any worries. Doing so makes them all time available back-up of required files. Moreover, the cloud can be accessed from anywhere at any time and can be even used for bulk migration. 

Thus, the required OST files become safe and handy on few clicks. However, few questions protrude while we think of OST files. It relates to “What happens if OST files get corrupt?” “Will it anyhow affect the existence of PST?” If how, then what will be the concerning factors?

To make the picture clearer it must be clear that the initial focus is to rescue the damaged OST files content and try to keep data hierarchy unchanged without any issues. To be answerable in such unexpected circumstances it is necessary to avail some technical assistance from reliable third-party tool. 

Managing spoilt OST files

There is high probability of getting OST files affected by corruption. However, the severity of OST file corruption is beyond the scope of the topic, but its impetus may somehow put a massive effect on entire file structure. 

image

Figure 1 Dialog Box presenting technical issue.

You must be introduced to the dialog box that displays the inaccessibility information. It is not the single note; moreover, there are ample of them that convey the same message in other manner. 

However, assistance from third-party proved to be helpful. Kernel for OST to PST is the most convenient and user-enabled third-party tool, which is often recommended for this purpose. This OST to PST tool simply scans for damaged/corrupt OST files and repairs them keeping OST file hierarchy and data structure unchanged. Moreover, the tool provides an option either to directly migrate the OST files to cloud-based platforms or convert same to PST and other file formats like DBX, MBOX, MSG, EML, TXT, RTF, HTML, MHTML, & PDF.

What takes for restructuring lost OST files?

Kernel for OST to PST makes use of inbuilt QFSCI algorithm to regain the lost file structure of OST files, it also includes resurrection of OST files content. So, to restructure the damaged OST files Kernel for OST to PST makes use of few essential steps, which include selection of concerned OST files, their preview post conversion and their migration/conversion as per user’s choice. The entire process is done within few clicks and conversion/migration entirely depends upon user’s choice.

Cloud-based Migration-User’s choice

Being a choice of next generation, cloud-based migration is being effectively used and recommended by many users.  Kernel for OST to PST provides such option in addition to the conventional methods of saving OST files in other formats. The screenshot of the tool clearly shows the effectiveness of the tool in handling the OST data in conventional process and cloud-based migration that involves email servers, webmails and Office 365.


image

Figure 2 Screenshot of Kernel for OST to PST presenting different options.


About Kernel for OST to PST

Kernel Data Recovery has designed a more secure way than conventional methods that were quite risky and time consuming. A more dedicated tool – Kernel for OST to PST has been crafted for this purpose. Kernel for OST to PST uses a secure way to convert OST files to other file format. Thus, it brings a clear picture to the user that OST files can be saved in other formats as well with same dedication and precision as it does for PST file format. Even if the obtained files are large in size, then it can be split in required size. For lost OST files Kernel for OST to PST provides ‘Search’ option. The ‘Preview’ option lets user to make sure that entire conversion has been perfectly taken place. This option provides preview of converted items. 

With the below mentioned descriptive figure you can understand the exact functioning of the tool. 

image

Figure3.Making file selection and uploading.

image

Figure4.Details of concerned files and different saving option.

image

Figure5. Saving Path of desired file.

For perfect conversion process to initiate, the user system must have Pentium class processor, minimum 64 MB RAM, 50 MB space for software installation and some space to save results. The tool supports all versions of MS Exchange Server, MS Outlook, Outlook Express, Windows Server and Windows OS. 

Securing OST files-An Ultimate Aim

For secure OST migration to cloud-based platforms it is recommended to take assistance from reliable third-party tool like Kernel for OST to PST. Due to provision of secure migration and conversion, this tool is highly advised. Since cloud-based migration provides effective and convenient access to OST files; therefore, it is regarded as future cloud for MS Outlook users.

You could download the copy from the below location

http://www.nucleustechnologies.com/exchange-ost-recovery.html

PowerShell Script to copy Exchange GUID from Office 365 to Exchange On-prem User.

When users are been migrated from On-Prem to Office 365 using some third party tool then the on-prem user object’s Exchange GUID gets rested to “00000000-0000-0000-0000-000000000000" . This will cause problem when we need to move back the mailbox to on-prem for some reason.  Below is the code which helps to validate the On-prem users which Exchange GUID and copy back the Exchange GUID properties from Online mailbox to the Exchange On-prem user.

Set-ADServerSettings -ViewEntireForest 1
"Remotemailbox" > c:\temp\myremotemailbox.csv
get-remotemailbox  -resultsize unlimited  | %{
$upn = $_.UserPrincipalName
$proxy = $_.EmailAddresses.ProxyAddressString
$exchGuid = $_.ExchangeGuid

$mailboxlist = @()
$found = $false
    foreach($pro in $Proxy)
    {
        If($pro -like "X500:/o=ExchangeLabs/*")
        {
        $found = $true
        }
    }
    if($found -eq $true)
    {
        $upn >> c:\temp\myremotemailbox.csv
    }
    if($exchGuid -eq "00000000-0000-0000-0000-000000000000")
    {
       
        $upn >> c:\temp\myremotemailbox.csv
   
    }
}

$LiveCred = Get-Credential
$Session = New-PSSession -ConfigurationName Microsoft.Exchange -ConnectionUri https://ps.outlook.com/powershell/ -Credential $LiveCred -Authentication Basic -AllowRedirection
Import-PSSession $Session –allowclobber

$csvimport = Import-Csv C:\temp\myremotemailbox.csv
"userprincipalname,legacyExchangeDN,ExchangeGuid" > c:\temp\rmbresult.csv
Foreach($csv in $csvimport)
{
$rmaibox = $csv.remotemailbox
$mailbox = get-mailbox $rmaibox | select userprincipalname,legacyExchangeDN,ExchangeGuid
$mailbox.userprincipalname + "," + $mailbox.legacyExchangeDN + "," + $mailbox.ExchangeGuid >> c:\temp\rmbresult.csv
}

remove-PSSession $Session

$finalRM = Import-csv C:\temp\rmbresult.csv
foreach($final in $finalRM)
{
$upn = $final.userprincipalname
$eguid = $final.ExchangeGuid
$x = "X500:"  +  $final.legacyExchangeDN

if($upn -ne "")
{
get-remotemailbox $upn | Set-reMotemailbox -exchangeguid $eguid -CustomAttribute3 "Account Verified for X500-GUID" -EmailAddresses @{Add=$x}

}
}

Configuring LoadMaster Global Balancing for Exchange 2013 – Part 3

In Part 1 and Part 2 of the article series, we deployed Exchange 2013 servers in each AD site, deployed Kemp LoadMaster and configure it for Exchange services in each AD site.

In this final part of the article series, we will configure LoadMaster with Global Balancing, where if Dallas AD site goes down then client request (internal and external) will route to Exchange 2013 servers in the Pittsburg AD site and vice versa. Global Balancing provide redundancy for both Exchange and LoadMaster itself. Below is the figure 3.1 is the current diagram for the Exchange 2013 lab using Kemp Free LoadMaster

image

Figure 3.1 Exchange 2013 and Kemp LoadMaster LAB configuration.

Configure Static Routes on Kemp LoadMaster

From the above Figure 3.1, Dallas LoadMaster Eth0 interface is configured with network 192.168.1.0/24 network and LAB router with DHCP have assigned DNS and Default gateway for this interface. Using DNS and default gateway, Eth0 interface can reach any external network including Pittsburg Eth0 interface.

image

Figure 3.2 DNS Name Server IP address

But, Dallas LoadMaster Eth1 interface is on 10.10.10.0/24 and it does not configured with DNS and default gateway. Since, two network interface (NIC) on the same machine cannot be configured with two different DNS and Gateway. Hence Eth1 interface has no information on how to reach Eth1 network (20.20.20.0/24) of Pittsburg LoadMaster or any other network internally. To archive this, we need to add manual static routes on the Dallas LoadMaster. Below is the steps to configure the same.

1. Connect to Dallas LoadMaster using Internet Explorer

2. Expand System Configuration -> Additional Routes

3. Add route to reach 20.20.20.0/24 network using gateway 10.10.10.101 (It is the default gateway for 10.10.10.0/24 network to reach Pittsburg network). Below Figure 3.2 is the reference image.

image

Figure 3.3 Adding new Fixed Static Routes on Dallas LoadMaster

Similarly, Pittsburg LoadMaster Eth1 interface is on 20.20.20.0/24 and it is not configured with DNS and default gateway. It has no information on how to reach Eth1 10.10.10.0/24 Dallas network or any other network. Hence we need to add static routes on the Pittsburg LoadMaster to reach Dallas Eth1. Below is the steps to configure the same.

1. Connect to Pittsburg Loadmaster using Internet Explorer

2. From the Left menu , expand System Configuration -> Additional Routes

3. Add route to reach 10.10.10.0/24 network using gateway 20.20.20.101 (It is the default gateway for 10.10.10.0/24 network). Below is the reference image.

image

Figure 3.4 Adding new Fixed Static Routes on Pittsburg LoadMaster

Configuring LoadMaster to Synchronize Configuration each other:

Synchronization lets to replicate the configuration changes or additions done one LoadMaster to another. Below are the steps to synchronize two LoadMaster on Dallas and Pittsburg network.

1. Connect to Dallas LoadMaster from the browser using the IP Address https://192.168.1.100

2. From the main menu ,expand System configuration -> remote Access

3. Under GEO Settings, specify GEO LoadMaster Partners IP Address and click on set Geo LoadMaster Partners. In our case it is Pittsburg LoadMaster Eth0 interface IP address – 192.168.1.101

image

Figure 3.5 Configuring GEO LoadMaster Partner Settings at Dallas

4. Now, connect to Pittsburg LoadMaster from the browser using the IP address https://192.168.1.101

5. From the main menu ,expand System configuration -> remote Access

6. Under GEO Settings, specify GEO LoadMaster Partners IP Address – 192.168.1.100 and click on Set Geo LoadMaster Partners. In our case it is Dallas LoadMaster Eth0 interface IP address

image

Figure 3.6 Configuring GEO LoadMaster Partner Settings at Pittsburg

7. Now we have configured the synchronization between Dallas and Pittsburg LoadMaster, we just make configuration on any one LoadMaster and it gets replicated to other.

Configuring Global Balancing for FQDN – mail.happy.com

1. Connect to Dallas LoadMaster and from the main menu Expand Global Balancing -> Manage FQDNs

2. Input the new FQDN name – mail.happy.com and click on Add FQDN

image

Figure 3.7 Configure Mail.happy.com FQDN at LoadMaster

3. Enter the LoadMaster Dallas External Virtual IP Address – 192.168.1.90 and click on Add Address

image

Figure 3.8 Configure Mail.happy.com FQDN with Dallas External Virtual IP Address

4. Similarly add Pittsburg Loadmaster External Virtual IP address – 192.168.1.91 and click on Add Address

image

Figure 3.9 Configure Mail.happy.com FQDN with Pittsburg External Virtual IP Address

5. Then finally, add Dallas LoadMaster internal Virtual IP – 10.10.10.90 and then Pittsburg LoadMaster Virtual IP – 20.20.20.91

image

Figure 3.10 Mail.happy.com FQDN updated with Dallas and Pittsburg External and Internal Virtual IP Address

6. To provide better health check for the HTTPS services, change the checker from ICPM Ping to TCP Connect for the Virtual IP Address on port 443 and then click on Set Addr

image

Figure 3.11 Configure Mail.happy.com FQDN with Health settings to determine the availability of the services.

7. We could now see that all the Servers are Available and healthy and ready to take connection for mail.happy.com

Configuring Global Balancing for FQDN – autodiscover.happy.com

Since, we have one Virtual IP for all the Exchange HTTPS services on each LoadMaster, we would need to create another FQDN name autodiscover.happy.com and follow the same instruction provided for same IP address and port number used for FQDN name mail.happy.com.

image

Figure 3.12 Configure autodiscover.happy.com FQDN with Pittsburg External and internal Virtual IP Address

Configuring Global Balancing for FQDN – smtp.happy.com

1. Connect to Dallas LoadMaster using Internet Explore

2. Expand Global Balancing -> Manage FQDN

3. Add a FQDN name smtp.happy.com’ and click Add FQDN

image

Figure 3.13 Creating new FQDN smtp.happy.com

4. Input each of the internal and external Virtual IP (VIP) address of both Dallas and Pittsburg LoadMaster and click Add Address. Then, make sure that checker is to set TCP connect for port 25.

image

Figure 3.14 Adding External VIPs for smtp.happy.com FQDN

Since Dallas and Pittsburg is configured to sync with each other, we should be able see the configuration synced from Dallas LoadMaster to Pittsburg LoadMaster in real-time. To validate the same, connect to Pittsburg LoadMaster and Navigate to Global Balancing -> Manage FQDNs.

image

Figure 3.15 Validation Global Balancing synchronization at Pittsburg LoadMaster.

DNS Configuration:

We are almost done with the LoadMaster configuration at both Dallas and Pittsburg AD site. Now we need to configure Internal and External DNS with delegated subdomain for mail.happy.com and autodiscover.happy.com pointing to LoadMaster Virtual IP Address defined in the below table.

image

To accept SMTP emails from internet for happy.com, configure MX records on the external DNS to point to the external DNS VIP of both Dallas and Pittsburg LoadMaster and below are the details.

image

Configure Exchange send connector with option ‘Route mail through smart host’ and specify the LoadMaster SMTP Internal VIP Address – 10.10.10.103 and 20.20.20.104.

This configuration will help clients to connect to all the HTTPS service and also mail flow between internal and internet.

Below is the final diagram with complete IP Address, DNS, LoadMaster and Exchange server details.

image

Figure 3.15: Final LAB diagram

Finally, we are at the end of the articles series, completely installed, configured Kemp Free LoadMaster in both the AD sites and also configured Global balancing between the sites. Same steps can be followed to implement LoadMaster in production environment, but we need public IP address NATed to the DMZ VIPs to communicate with other external domains.

Configure LoadMaster for Exchange 2013 Services in LAB – Part 2

In part 1 of the article series, we got Exchange 2013 configured, Hyper-V networks configured and installed LoadMaster in both the AD site and finally configure with Two-Arm networks. In this part of the article series we will configure LoadMaster for Exchange HTTPS and SMTP services. Below Figure 2.1 is the current lab setup with IP address configuration.

image

Figure 2.1 Current lab setup with IP address configuration.

Importing Exchange Kemp Templates into the LoadMaster

Kemp offers free templates for Exchange 2013 with preconfigured settings. These preconfigured templates are based on the Microsoft best practice and helps us to keep our configuration simpler and quicker. These configurations can further tweaked to suites the complex environment and business requirements.

1. Download Exchange 2013 Core Services template from Kemp LoadMaster documentation page on the Hyper-v host machine

https://kemptechnologies.com/loadmaster-documentation/.

image

Figure 2.2 Downloading Exchange 2013 Core Services template.

2. Core services template helps administrator to configure all the Exchange 2013 HTTPS, SMTP and MAPI protocols easily with minimum configuration steps.

3. Connect to the Dallas LoadMaster from the host machine browser using the IP Address – https://192.168.1.100

4. Click on Virtual services -> Manage Templates

5. Click on Browse button to select the template file ‘Exchange2013Core.tmpl’ from the local machine and click on Add New Template button to import the same.

image

Figure 2.3 Importing Exchange 2013 Template

6. Once imported, it will display the details of all the templates imported

image

Figure 2.4 Exchange 2013 Templates after importing the downloaded template file

Perform the above steps 1-5 to import the Exchange 2013 Core Services template on Pittsburg LoadMaster.

Creating and Configuring HTTPS Virtual Services

In this part, we will configure one Virtual IP for all the Exchange 2013 HTTPS virtual services. HTTPS virtual services include OWA, EAC, Active sync, Outlook anywhere and EWS. We can also configure one virtual IP for each Exchange services. It is complex to configure but provides better redundancy for each of the Exchange services.

Follow the below steps to configure Dallas LoadMaster with one Virtual IP address for all the Exchange HTTPS services.

1. Connect to the Dallas LoadMaster from the browser using the IP Address – https://192.168.1.100

2. Expand Virtual Services -> click Add new

3. To allow external clients to connect to Exchange, sepcify VIP – 192.168.1.90 on port 443, then select use template Exchange 2013 HTTPS and click on Add this virtual service.

image

Figure 2.5 Adding Virtual IP Address for Exchange 2013 HTTPS

4. It then redirects to the properties page of Virtual IP(VIP) address

5. Under Basic Properties, specify the Alternative Address as 10.10.10.90 from which is from Dallas internal network segment.

image

Figure 2.6 Exchange 2013 HTTPS Basic properties configuration.

6. Keep the Standard Options, SSL Properties, Advanced Properties, and ESP Options as default.

image

Figure 2.7 Exchange 2013 HTTPS Standard Options, SSL Properties, Advanced Properties, and ESP configuration.

7. Under Real Servers properties, click on Add New button to add the Dallas Exchange 2013 server

image

Figure 2.8 Exchange 2013 Real Servers Properties

8. Specify the Dallas Exchange 2013 IP Address -10.10.10.2 and click Add This Real Servers

image

Figure 2.9 Specifying Exchange 2013 Server Address for Real Servers options.

9. Validate the addition of Exchange 2013 server under real servers.

image

Figure 2.10 Validating Addition of new Exchange 2013 Real Servers Properties

10. Finally, click on View/Modify services from the main menu to confirm the new HTTPS Virtual IP Addresses and services status is UP.

image

Figure 2.11 Validating HTTPS Virtual IP Addresses and services status

Perform the above operation from step 1 – 11 on Pittsburg LoadMaster to configure External Virtual IP Address 192.168.1.91 and internal alternative Virtual IP as 20.20.20.91. Make sure to add the internal Pittsburg Exchange 2013 server IP address 20.20.20.2 under Real Servers.

Creating and Configuring SMTP Virtual Services

SMTP Virtual services help to route email between internal and external network. Internet MX records must be configured to these external Virtual Address so internet emails are delivered to it. LoadMaster process the Internet email and forwards to the internal Exchange servers. Similarly Internet email from internal are accepted by the LoadMaster and it will be process delivered to external. Below are the steps to configure the same:

1. Connect to the Dallas LoadMaster using browser – https://192.168.1.100

2. From the main menu, expand Virtual Services -> select Add new

3. Input the Virtual Address 192.168.1.103 , select use template Exchange 2013 SMTP and click on Add This Virtual Service

image

Figure 2.12 creating new Virtual IP Address for Exchange 2013 SMTP services.

4. It then redirects the advance properties page

5. Specify the Alternative Address – 10.10.10.103 from Internal network subnet

image

Figure 2.13 Configuring Exchange 2013 SMTP basic properties.

6. Keep Standard Options, SSL Properties, Advanced Properties and ESP Options as default

7. Click on Add New button from Real Serves options to add the Dallas Exchange 2013 server.

image

Figure 2.14 Configuring Real Servers properties.

8. Specify the Exchange 2013 IP Address -10.10.10.2 and click on Add this Real Servers

image

Figure 2.15 Adding Exchange 2013 Server under Real Server.

11. Validate the Exchange 2013 server IP address and port under Real Servers.

image

Figure 2.16 Validating Exchange 2013 Server under Real Server.

12. Click on View/Modify Services to confirm the new SMTP Virtual IP Addresses and services status is UP

image

Figure 2.17 Validating new Exchange SMTP Virtual Service.

Perform the above operation from step 1 to 13 on Pittsburg LoadMaster to configure External SMTP Virtual IP Address 192.168.1.104 and internal alternative Virtual IP as 20.20.20.104. Finally, make sure to add internal Exchange server IP Address – 20.20.20.104 under Real Servers and validate the same.

We have almost done with the configuration of LoadMaster in the lab and below Figure 2.18 is the final Exchange 2013 LAB using Kemp Free LoadMaster. It has all the necessary VIP address for client connection.

image

Figure 2.18 Exchange 2013 LAB using Kemp Free LoadMaster

Importing Exchange 2013 Certificate into the LoadMaster

Currently LoadMaster is not configured with SSL Offloading. SSL Offloading terminates the client SSL connection at the LoadMaster and generate the new connection to the Exchange server in the backend. This improve the security and performance for client connection. This is an optional settings and below are the steps to perform the same:

1. Export the SAN Certificate from the Exchange server 2013 with private key in PFX format and password.

2. Connect to the Dallas LoadMaster through internet Explorer

3. Click on Mail Menu -> Certificate -> SSL certificate and click on Import Certificate

image

Figure 2.19 SSL Certificate Import option on LoadMaster.

4. Specify the Exchange Certificate file path, Pass Phrase (password applied during the export) and Certificate Identifier. Click on Save to import the certificate into the LoadMaster

image

Figure 2.20 Importing SSL Certificate into the LoadMaster

5. Modify the Exchange HTTPS virtual Service and expand SSL Properties

6. Enable SSL Acceleration and Reencrypt option. Then set the available Exchange certificate and move it to assigned certificates. Lastly select Best Practices under Cipher set and click on Modify Cipher Set.

image

Figure 2.21 Configuring SSL Offloading and assigning Exchange certificate on the LoadMaster

Follow the above instruction from step 1-6 on the Pittsburg LoadMaster to import the Exchange certificates and configure SSL offloading.

We are almost at the end of the Part 2 article series and configured with LoadMaster for Exchange 2013 HTTPS and SMTP Services. In the next and final part of the article series, we will configure Geo Redundancy. Which allows clients to connect to the available Exchange servers, if any of the Exchange servers/services /AD sites goes down.

Deploying a Free LoadMaster at Your Exchange 2013 lab – Part 1

In this article series, we will understand the step by step instruction to deploy Kemp LoadMaster for Exchange Server 2013 services in multi- site (Dallas and Pittsburg) lab environment and also configure geo-redundancy between the two AD sites. Where the Kemp LoadMaster load balances the client requests( from internal and internet network) within the AD site and also routes the client request automatically to the available Exchange 2013 servers in other site when one AD site goes down.

Current LAB Setup

Current Lab is built on Microsoft Hyper-V and it is configured with two AD sites Dallas (10.10.10.0/24 network) and Pittsburg (20.20.20.0/24 network). It is also installed with domain controller on each site with the domain name happy.com. In each of the AD site, one Exchange Server 2013 (multirole) is installed and configured Database Availability Group (DAG01) between them. Below Figure 1.1 has the details of the AD sites, Domain Controller, Exchange nodes and DAG.

image

Figure 1.1 Exchange 2013 deployed in the lab environment.


LAB Hyper-V Virtual Network Configuration Requirement:

LoadMaster interfaces with both internal network and external/internet network. Hence, Hyper-V needs to configure with two Virtual networks: DMZ Network and Internal Network.

1. DMZ Network: Create a new DMZ Network virtual network of type External network, it should connect to the host Machine network interface card (NIC) and communicates with the external world. Make sure to select Allow management operation system to share this network adapter. The Figure 1.2 has the details of the same. Host machine NIC should be connected to the internet.

image

Figure 1.2 DMZ Network configuration

2. Internal Network: Create new Internal Network virtual network of type Internal Network. Internal network is isolated network which can communicate within themselves. We will configure all Exchange Servers 2013 guest machines NICs to use internal network.

image

Figure 1.3 Hyper-V Internal Network Configuration.

A Windows VM is configured as Router with two NICs pointing to internal network. This windows Router will route traffic between two network segment Dallas (10.10.10.x) and Pittsburg (20.20.20.x) within the internal network.

Configuring Kemp LoadMaster in the Exchange 2013 lab

In this part , we will Install and configure LoadMaster on both the AD site in Two-Arm Deployment as defined in the below Figure 1.4. With one NIC pointing the DMZ network and other NIC pointing to the internal network.

image

Figure 1.4 Kemp LoadMaster deployment and IP address configuration plan

Configuring LoadMaster for Dallas Network

1. Register a new Kemp ID at http://freeloadbalancer.com and download the latest version of Free Kemp loadmaster for Hyper-V

image

Figure 1.5 Free Kemp LoadMaster Website

2. Extract the KEMP LoadMaster Virtual Machine (VM) file on the Hyper-V server.

3. Start Hyper-V Manager and click on Import VM from the Actions menu then click on Next at the Welcome Screen.

image

Figure 1.6 Importing LoadMaster Virtual Machine into Hyper-V

4. At Local Folder page, Click on Browse button to specify the Kemp LoadMaster virtual machine and click Next and on Select Virtual Machine page keep the settings as default and click on Next

image

Figure 1.7 Specify the Folder containing virtual machine to import

5. Choose the option Copy the Virtual Machine (create a unique ID) to make of copy of the VM with the new unique ID and click Next. (This will help us to create multiple copy of the downloaded LoadMaster image)

image

Figure 1.8 Choose the virtual machine Import type

6. Choose folders paths to store the new copy of the LoadMaster VM and click Next.

image

Figure 1.9 Choose Virtual Machines files path

7. Then Choose Storage folders path for the new VM and click Next

8. Validate the Summary page and click on Finish to import the Virtual Machine (VM) into Hyper-V console.

image

Figure 1.10 Completing Import Wizard.

9. To identify the Dallas Load Master in the Hyper-V, rename the newly imported LoadMaster VM to DalKemp.

image

Figure 1.11 Renaming LoadMaster VM in Hyper-V Manager

10. To configure the virtual network on the DalKemp VM, right click on LoadMaster VM and select Settings. Select DMZ Network for the first VM-Bus network Adapter and Internal Network for the second VM-Bus network adapter and click on Apply. Below Figure 1.12 has the reference details.

image

Figure 1.12 Configure Network Adapter on DalKemp VM

Connecting to LoadMaster and Activating Free License

1. Boot the DalKemp LoadMaster VM from Hyper-V console

2. Post booting it displays IP Address of the Appliance (in our case it is 192.168.1.100). It is been assigned by the LAB router via External DMZ network. Since, this network is sharing the host NIC and also connected to the Lab router with DHCP Configured.

Note: The Default Username/Password: bal /1fourall

image

Figure 1.13 DalKemp LoadMaster connection information.

3. To configure the DalKemp LoadMaster, start Internet Explorer and connect to it using the IP address assigned – https://192.168.1.100

4. Provide the Default credentials Username/Password: bal /1fourall

5. Click on Agree to accept the End User Agreement

image

Figure 1.14 Accepting EULA

6. Select License Type as Free LoadMaster and click on Allow to connect back to KEMP home for license activation.

image

Figure 1.15 Selecting License Type

7. Use the registered KEMP ID and activate free LoadMaster license.

image

Figure 1.16 Activating Free LoadMaster License

8. Once activated, it will prompt to reset the default user (bal) password. Once password is changed then re-login back to the VM using new password.

Configuring LoadMaster Network Interface

1. Login to Kemp LoadMaster from Internet Explorer and under Main menu expand system configuration -> interface

2. Select eth0 (Network Interface 0) and validate IP Address – 192.168.1.100/24. It is been assigned by DHCP and we could use the same on the interface and change it if required. Make sure Use for GEO Responses and Request is checked and this interface will be used to communicate with Pittsburg LoadMaster for geo redundancy.

image

Figure 1.17 Configuring LoadMaster eth0 Interface

3. Select eth1 (network Interface 1) and assign the IP address 10.10.10.9/24 from the Dallas internal network segment and click on Set Address. This interface will be used to communicate with internal Exchange 2013 servers in the Dallas and Pittsburg AD sites.

image

Figure 1.18 Configuring LoadMaster eth1 Interface

Follow the above Instructions: Configuring LoadMaster for Dallas Network, Connecting to LoadMaster and Activating Free License, Configuring LoadMaster Network Interface to import and configure Pittsburg LoadMaster. Configure interface Eth0 with IP address 192.168.1.101/24 (Pittsburg DMZ network) and Eth1 with 20.20.20.9/24 (Pittsburg internal network) on it.

With this we are at the end of the part 1 of the article service with Exchange server 2013 installed and configured, Hyper-V networks configured and finally installed and configured LoadMaster in both the AD site. In the next part we will configure the LoadMaster for the Exchange HTTPS/ SMTP Services and validate the same.

New features in Exchange Server 2016


Microsoft Exchange Server 2016 is new latest version of Exchange server and it is been enhanced from Exchange 2013 and it is built on proven Office 365 model. It provides the same look and feel of Exchange 2013 but it offers more stability,reliability, better fault tolerance and self-healing capabilities.

Exchange 2016 can co-exists only with Exchange 2010 SP3 RU11 and above, Exchange 2013 CU10 and above. But it cannot co-exist with Exchange 2007 or any previous versions of Exchange.

Exchange 2016 inherits most of the features from Exchange 2013 and below are some of the new features in addition to the existing feature of Exchange 2013

Architecture enhancements

Microsoft simplified the architecture by consolidating the Client access role and Mailbox role of Exchange 2013 into one mailbox server role and Edge transport server role. This integration of roles reduces hardware, implementation, and management efforts and in some usage scenarios lower licensing costs.

Mailbox Server Feature

o Mailbox server contains mailbox database which stores and process emails.

o Transport service performs routing of emails within internal and to the external.

o Client access service accepts all the client connection and connect them to the mailbox database

o Unified messaging service provide voice mail and other telephony service

Edge Server Feature

o Edge Server is located in perimeter /DMZ network and it is to interface between external to internal and vice versa.

o It offers anti-spam, content, connection filtering service for the internet emails.

Mailbox Server enhancements

· Database divergence detection keeping looking for the database which is out of sync. It automatically reseeds to bring it into a healthy state.

· Exchange 2016 supports much faster database failover and failback, and also provides a faster site resilience than previous version of Exchange.

· MAPI over HTTP is the default protocol for outlook client’s connection to the Exchange servers.

· The content/search index are built from the local copy rather than from the active copy. It reduces the network utilization across the WAN in multi-site environment.

· Disk IOPs utilization has been reduced by 22% from Exchange 2013.

Hybrid enhancements

· Downloadable Hybrid deployment wizard for Exchange 2016 made the hybrid configuration and deployment troubleshooting easier.

· Exchange 2016 on-premises users can make use Office 365 services such as archiving, data loss prevention, rights management, advanced thread protection, mobile device management, spam/virus filtering protection etc.

Client features

· Outlook Web Access (OWA) is now called as ‘Outlook on the Web’. It can work together with SharePoint 2016 or OneDrive for Business to share and edit documents. Recipients are automatically provided permission to edit the document. This allows recipients to manage and edit a document without going to SharePoint.

· Search has been significantly enhanced in Exchange 2016. Outlook 2016 and Outlook on the Web provide the same search results. Search speed has also been significantly increased and calendar items can now be searched from Outlook on the Web.

· Outlook 2016 introduces a new Clutter folder that store low priority messages. Outlook itself can assign a low priority to emails based on the past user actions on the emails.

· The Smarter Inbox features helps to increases emails and document search efficiency and productivity.

· The “Tell me what you want to do” box helps users to easily find specific outlook functions or search the web.

· Some great enhancement in Outlook on the Web are one click archiving, common typos/suggestion, the ability to import contacts from CSV files, better formatting features, better attachment views, inline replies, inline previews of URLs and videos and many more.

Mobile enhancements

· Mobile users are new getting rich user experience on phones and tablets. Search on mobile devices has been improved to provide better search results. Two new tabs in the mobile clients: Focused and Others. Where the ‘Focused’ tab will contains all the important email and the ‘Other’ tab is supposed to contain relatively unimportant emails such as newsletters, notifications, subscriptions, etc.

· Mobile version of Outlook provides ‘Send Availability’ Option. It allows users to send availability time slots to external recipients.

· The mobile calendar view has been greatly improved and it provides more detailed information of invites and other necessary information.

Security and compliance features

· Data Loss Prevention (DLP) has been enhanced and now it can identify, monitor, and protect 80 different types of sensitive information.

· Auditing has been enhanced and updated with a new architecture. Audit logs are no longer stored in individual mailboxes but they are now stored in the centralized audit report mailbox of the organization. This is helpful for long term retention and adds the ability generate various reports easily.

· eDiscovery search has been improved significantly to provide more accurate , faster and reliable results.

· eDiscovery Compliance Search can be used to search on very large numbers of mailboxes. Multile searches can be performed at the same time.

· Public folder content can be on placed on In-place hold and public folder contents can be searched using the eDiscovery.

Exchange 2016 has discontinued Client Access Server and RPC over HTTP protocol for client connection from Exchange 2013. Exchange Server 2016 is great new release of Microsoft’s mail server. It simplifies administration, improves the integration with Office 365 and together with Outlook 2016 and OWA 2016 it helps improve productivity of end users.

Publishing Exchange and ADFS Server for Office 365 using IIS ARR Server

I found this article series extremely helpful where you want to publish Exchange and also want to publish ADFS servers for Office 365 SSO using  free IIS Application Request Routing proxy server.


Part 1 : Reverse Proxy for Exchange Server 2013 using IIS ARR
Part 2: Reverse Proxy for Exchange Server 2013 using IIS ARR
Part 3: Reverse Proxy for Exchange Server 2013 using IIS ARR
Part 4: IIS ARR as a Reverse Proxy and Load balancing solution for O365 Exchange Online in a Hybrid Configuration


Happy Reverse proxy